> ## Documentation Index
> Fetch the complete documentation index at: https://elatoai.com/docs/llms.txt
> Use this file to discover all available pages before exploring further.
# Your Local Firmware Guide
> Let's make sure you have the right firmware settings for your Voice AI Project
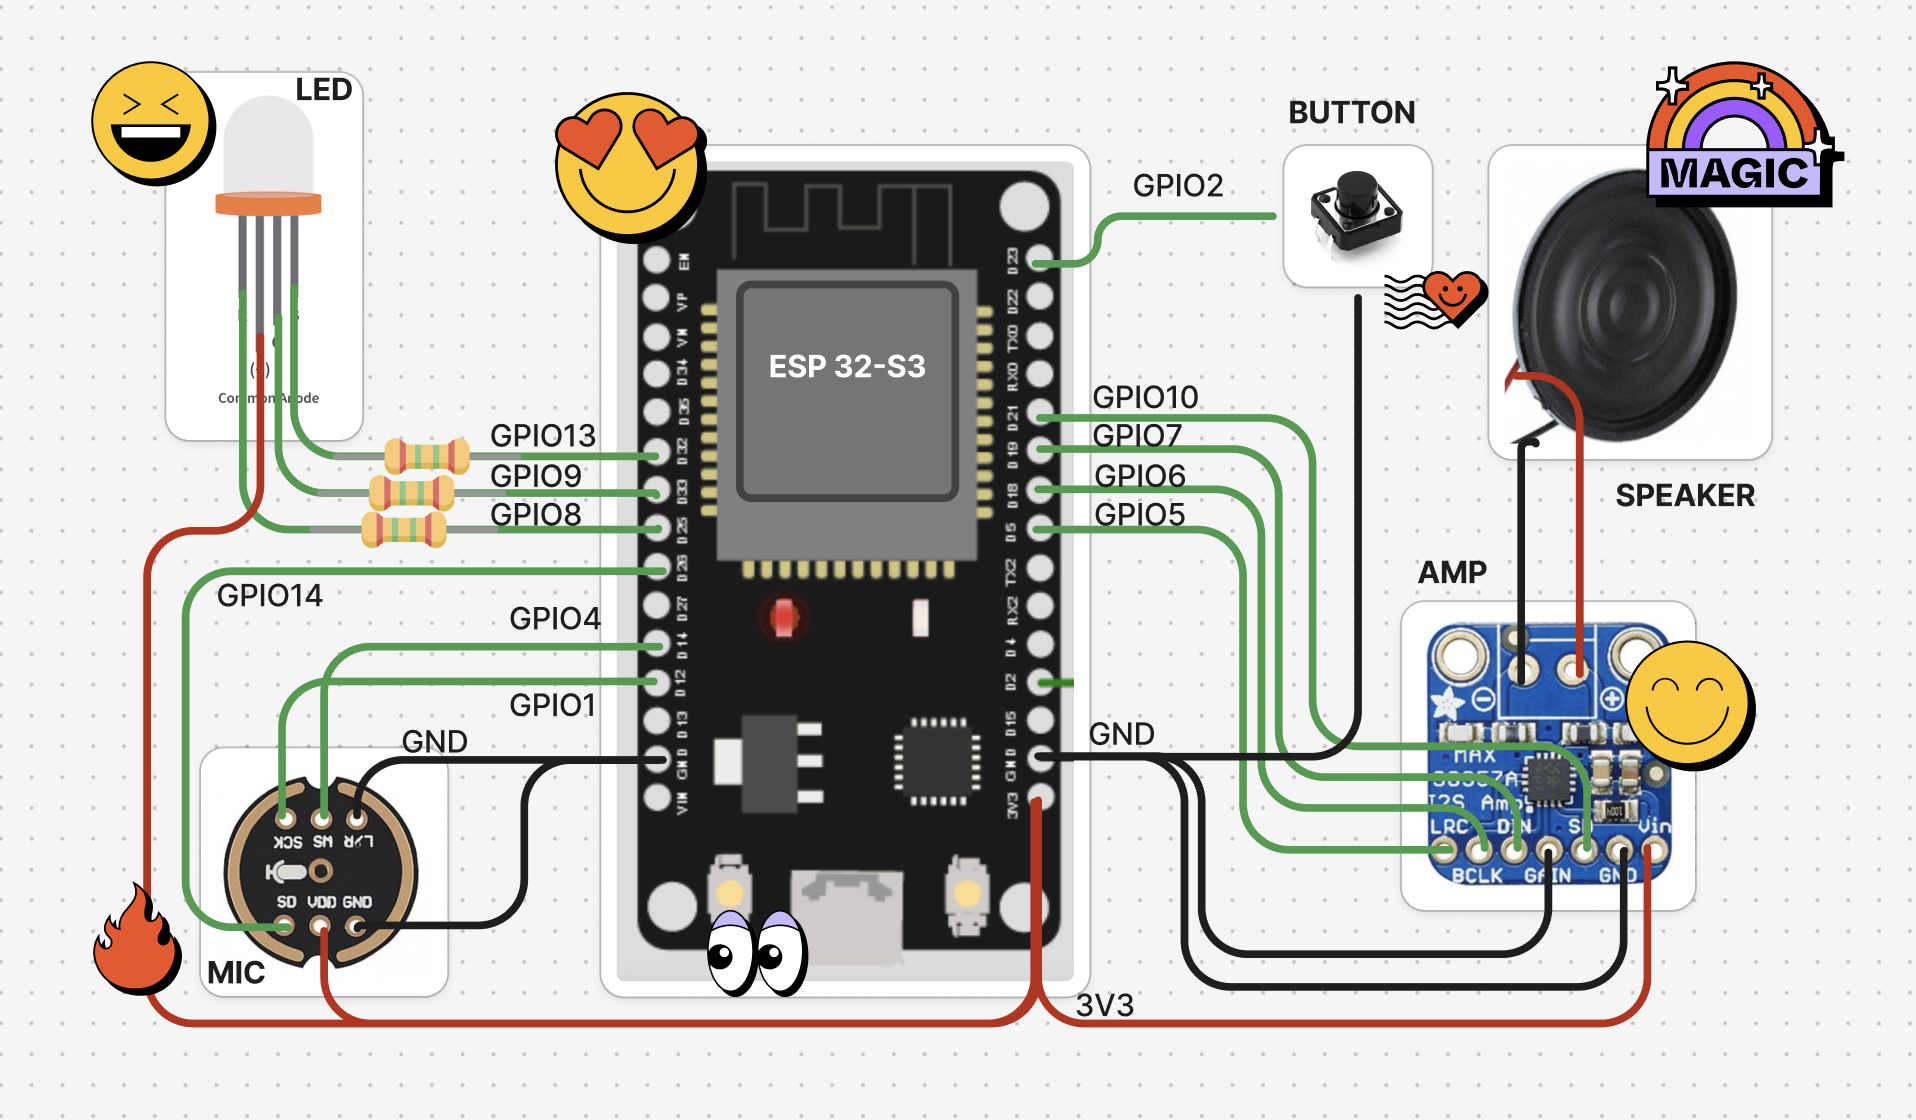
## Hardware Setup
## What you'll need
1. ESP32-S3 (by Espressif / Arduino)
2. Cables
3. INMP441 (I2S mic)
4. MAX98357A (I2S amp)
5. Speaker
6. LED
7. Button / Touchpad
8. USB cable (power)
## Pin Connections
We recommend these pin connections for compatibility with Elato.
| **Component** | **Standard ESP32** |
| ---------------- | ------------------ |
| **Microphone** | |
| SD (Data) | GPIO 14 |
| WS (Word Select) | GPIO 4 |
| SCK (Clock) | GPIO 1 |
| **Speaker** | |
| WS | GPIO 5 |
| BCK | GPIO 6 |
| DATA | GPIO 7 |
| SD (shutdown) | GPIO 10 |
| **Control** | |
| Button/Touchpad | GPIO 2 |
| LED (Blue) | GPIO 13 |
| LED (Red) | GPIO 9 |
| LED (Green) | GPIO 8 |
## Config Settings
Before flashing, pick the mode that matches your setup in `config.h`.
```c theme={null}
// ---------- CHOOSE YOUR MODE ----------
// Pick one of the following (DEV_MODE, PROD_MODE, ELATO_MODE) , comment the rest
// For ELATO_MODE, you will need to register your DIY Hardware on the Elato website
#define DEV_MODE
// #define PROD_MODE
// #define ELATO_MODE
// ---------- Touch mode ----------
// If you want to use the touch sensor to wake up the device, uncomment the following line
// If you want to use the button to wake up the device, comment the following line
#define TOUCH_MODE
```
## Server settings (`src/Config.cpp`)
4. Edit `src/Config.cpp` with your server details:
* If using locally: Set your computer's IP address in `ws_server` and `backend_server`
* If using production: Ensure you have proper certificates set
## What's my IP address?
1. View your Wifi IP when you click on Wifi Settings > Your Wifi Network > Details, OR
2. On macOS/Linux: Open Terminal and run `ifconfig`
3. On Windows: Open Command Prompt and run `ipconfig`
4. Look for your active network interface (WiFi: `en0` on Mac, `wlan0` on Linux, `Wireless LAN adapter Wi-Fi` on Windows)
5. Note the IP address (e.g., `192.168.1.100`)
6. Update the ws server and backend server IP to your local IP address
### Ready to Flash your ESP32? ⚡️
***
## FAQs
### What's NVS Storage?
We store the following data in Non-Volatile Storage (NVS) on the ESP32:
1. **Auth token**: The supabase auth token that is used to authenticate the device with the backend server.
2. **Factory reset**: Whether the device has been factory reset.
3. **Wifi credentials**: The wifi credentials of the device.
### How do I connect my ESP32 to Wifi?
1. Power on your ESP32
2. You should see a WiFi network named `ELATO-DEVICE` appear in your phone / laptop's WiFi network list
3. Connect to this network
4. Navigate to `192.168.4.1` in the same phone / laptop's browser
5. Enter your home WiFi credentials
6. Power the device ON and OFF
7. Your ESP32 will now connect to the locally hosted **NextJS web-app** and **Deno server** on the same network!
### What do the lights mean? 🤔
Green: Setup mode and websocket/wifi is not connected
Blue: Device is speaking
Yellow: Device is listening to user
Red: Processing user request
Cyan: OTA in progress
Magenta: Soft AP mode
### Troubleshooting
* If connection fails, check your WiFi signal and that the local server is connected to the same network as the ESP32.
* Make sure an `auth_token` has been generated by calling the `generate_auth_token` endpoint on the NextJS web-app.
* Monitor serial output at 115200 baud for detailed logs.
**Need help?** Join our [Discord](https://discord.gg/KJWxDPBRUj) community and to any questions and share ideas.
 ## What you'll need
1. ESP32-S3 (by Espressif / Arduino)
2. Cables
3. INMP441 (I2S mic)
4. MAX98357A (I2S amp)
5. Speaker
6. LED
7. Button / Touchpad
8. USB cable (power)
## Pin Connections
We recommend these pin connections for compatibility with Elato.
| **Component** | **Standard ESP32** |
| ---------------- | ------------------ |
| **Microphone** | |
| SD (Data) | GPIO 14 |
| WS (Word Select) | GPIO 4 |
| SCK (Clock) | GPIO 1 |
| **Speaker** | |
| WS | GPIO 5 |
| BCK | GPIO 6 |
| DATA | GPIO 7 |
| SD (shutdown) | GPIO 10 |
| **Control** | |
| Button/Touchpad | GPIO 2 |
| LED (Blue) | GPIO 13 |
| LED (Red) | GPIO 9 |
| LED (Green) | GPIO 8 |
## Config Settings
Before flashing, pick the mode that matches your setup in `config.h`.
```c theme={null}
// ---------- CHOOSE YOUR MODE ----------
// Pick one of the following (DEV_MODE, PROD_MODE, ELATO_MODE) , comment the rest
// For ELATO_MODE, you will need to register your DIY Hardware on the Elato website
#define DEV_MODE
// #define PROD_MODE
// #define ELATO_MODE
// ---------- Touch mode ----------
// If you want to use the touch sensor to wake up the device, uncomment the following line
// If you want to use the button to wake up the device, comment the following line
#define TOUCH_MODE
```
## Server settings (`src/Config.cpp`)
4. Edit `src/Config.cpp` with your server details:
* If using locally: Set your computer's IP address in `ws_server` and `backend_server`
* If using production: Ensure you have proper certificates set
## What's my IP address?
1. View your Wifi IP when you click on Wifi Settings > Your Wifi Network > Details, OR
2. On macOS/Linux: Open Terminal and run `ifconfig`
3. On Windows: Open Command Prompt and run `ipconfig`
4. Look for your active network interface (WiFi: `en0` on Mac, `wlan0` on Linux, `Wireless LAN adapter Wi-Fi` on Windows)
5. Note the IP address (e.g., `192.168.1.100`)
6. Update the ws server and backend server IP to your local IP address
### Ready to Flash your ESP32? ⚡️
## What you'll need
1. ESP32-S3 (by Espressif / Arduino)
2. Cables
3. INMP441 (I2S mic)
4. MAX98357A (I2S amp)
5. Speaker
6. LED
7. Button / Touchpad
8. USB cable (power)
## Pin Connections
We recommend these pin connections for compatibility with Elato.
| **Component** | **Standard ESP32** |
| ---------------- | ------------------ |
| **Microphone** | |
| SD (Data) | GPIO 14 |
| WS (Word Select) | GPIO 4 |
| SCK (Clock) | GPIO 1 |
| **Speaker** | |
| WS | GPIO 5 |
| BCK | GPIO 6 |
| DATA | GPIO 7 |
| SD (shutdown) | GPIO 10 |
| **Control** | |
| Button/Touchpad | GPIO 2 |
| LED (Blue) | GPIO 13 |
| LED (Red) | GPIO 9 |
| LED (Green) | GPIO 8 |
## Config Settings
Before flashing, pick the mode that matches your setup in `config.h`.
```c theme={null}
// ---------- CHOOSE YOUR MODE ----------
// Pick one of the following (DEV_MODE, PROD_MODE, ELATO_MODE) , comment the rest
// For ELATO_MODE, you will need to register your DIY Hardware on the Elato website
#define DEV_MODE
// #define PROD_MODE
// #define ELATO_MODE
// ---------- Touch mode ----------
// If you want to use the touch sensor to wake up the device, uncomment the following line
// If you want to use the button to wake up the device, comment the following line
#define TOUCH_MODE
```
## Server settings (`src/Config.cpp`)
4. Edit `src/Config.cpp` with your server details:
* If using locally: Set your computer's IP address in `ws_server` and `backend_server`
* If using production: Ensure you have proper certificates set
## What's my IP address?
1. View your Wifi IP when you click on Wifi Settings > Your Wifi Network > Details, OR
2. On macOS/Linux: Open Terminal and run `ifconfig`
3. On Windows: Open Command Prompt and run `ipconfig`
4. Look for your active network interface (WiFi: `en0` on Mac, `wlan0` on Linux, `Wireless LAN adapter Wi-Fi` on Windows)
5. Note the IP address (e.g., `192.168.1.100`)
6. Update the ws server and backend server IP to your local IP address
### Ready to Flash your ESP32? ⚡️